
- Spring Security
- WebSecurityConfigurerAdapter configuration
- Adding user/password feature
- Configure UserDetailsServiceImpl in the SecurityConfiguration
- Securing application using JWT token
- Creating Authentication Functionality
- Summary
Our application already has a controller, thanks to which we can manage data using HTTP requests. However, we must set security so that only authorized persons can manage these data.
Spring Security
Spring Security provides security services for Spring-based applications:
- Single sign-on
- Protection against attacks like session fixation, clickjacking, cross-site request forgery, etc
- Basic Access Authentication
- Digest Access Authentication
- Remember-me feature
- Web Form Authentication
- Authorization
- HTTP Authorization
You can add Spring Security in your application by adding spring-boot-starter-security dependency to your pom.xml file. By the way, we’ll also add dependency to JWT. We will need it later:
<dependency>
    <groupId>org.springframework.boot</groupId>
    <artifactId>spring-boot-starter-security</artifactId>
    <version>2.1.5.RELEASE</version>
</dependency>
<dependency>
    <groupId>io.jsonwebtoken</groupId>
    <artifactId>jjwt</artifactId>
    <version>0.9.1</version>
</dependency>
WebSecurityConfigurerAdapter configuration
To configure Spring Security in our project, we have to add new configuration class that extends the WebSecurityConfigurerAdapter class in net.devdiaries.wallet.configuration package:
package net.devdiaries.wallet.configuration;

import org.springframework.context.annotation.Configuration;
import org.springframework.security.config.annotation.web.configuration.EnableWebSecurity;
import org.springframework.security.config.annotation.web.configuration.WebSecurityConfigurerAdapter;


@Configuration
@EnableWebSecurity
public class SecurityConfiguration extends WebSecurityConfigurerAdapter {
}
The @Configuration and @EnableWebSecurity annotations provide the default security configuration.
Now, we can define which endpoints should be secured. We have to override the configure(HttpSecurity HTTP method.
Adding user/password feature
We can use an in-memory user provided by Spring Security, but the real backend application should save the users in the database. We are going to create an entity class for the user (User.java) and repository class. It will be very similar to creating Currency.java and CurrencyRepository in the first post:
1 - User.java in the net.devdiaries.wallet.domain package:
package net.devdiaries.wallet.domain;

import lombok.Getter;
import lombok.Setter;

import javax.persistence.Entity;
import javax.persistence.Column;
import javax.persistence.Id;
import javax.persistence.GeneratedValue;
import javax.persistence.GenerationType;

@Entity
@Getter
@Setter
public class User {

 @Id
 @GeneratedValue(strategy = GenerationType.AUTO)
 @Column(nullable = false, updatable = false)
 private Long id;

 private String userName;
 private String password;

    public User(String userName, String password) {
        this.userName = userName;
        this.password = password;
    }

    public User() {
} }
2 - UserRepository.java in the net.devdiaries.wallet.domain package:
package net.devdiaries.wallet.domain;

import org.springframework.data.repository.CrudRepository;
import org.springframework.stereotype.Repository;

import java.util.Optional;

@Repository
public interface UserRepository extends CrudRepository<User, Long> {

 Optional<User> findByUserName(String username);
 }
Now, we have to create the UserDetailsService implementation. This class (provided by Spring Security) is used for finding and authenticating users. Let’s create a new package: net.devdiaries.wallet.services with UserDetailsServiceImpl class and inject UserRepository:
package net.devdiaries.wallet.services;

import net.devdiaries.wallet.domain.User;
import net.devdiaries.wallet.domain.UserRepository;
import org.springframework.beans.factory.annotation.Autowired;
import org.springframework.security.core.authority.SimpleGrantedAuthority;
import org.springframework.security.core.userdetails.UserDetails;
import org.springframework.security.core.userdetails.UserDetailsService;
import org.springframework.security.core.userdetails.UsernameNotFoundException;
import org.springframework.stereotype.Service;

import java.util.Arrays;

@Service
public class UserDetailsServiceImpl implements UserDetailsService {

 private UserRepository userRepository;

 @Autowired
 public UserDetailsServiceImpl(UserRepository userRepository) {
        this.userRepository = userRepository;
    }

 @Override
 public UserDetails loadUserByUsername(String userName) throws UsernameNotFoundException {
        User user = userRepository.findByUserName(userName)
                .orElseThrow(() -> new UsernameNotFoundException("User: " + userName + " not found"));
        return new org.springframework.security.core.userdetails.User(user.getUserName(), user.getPassword(),
                Arrays.asList(new SimpleGrantedAuthority("user")));
    }
}
We had to override loadUserByUsername(..) method. This method checks if the user was found or not. Finally, the method returns a Spring Security Userobject with the username, password, and role (we use new SimpleGrantedAuthority(“user”) for this tutorial) of the authenticated user.
Configure UserDetailsServiceImpl in the SecurityConfiguration
Let’s return to our SecurityConfiguration class (created above). Now we can complete its configuration:
@Configuration
@EnableWebSecurity
public class SecurityConfiguration extends WebSecurityConfigurerAdapter {

 @Autowired
 private UserDetailsServiceImpl customUserDetailsService;

 @Bean
 public PasswordEncoder passwordEncoder() {
        return new BCryptPasswordEncoder();
    }

 @Autowired
 public void configureGlobal(AuthenticationManagerBuilder auth) throws Exception {
        auth.userDetailsService(customUserDetailsService).passwordEncoder(new BCryptPasswordEncoder());
    }
We have added a configureGlobal(...) method to enable fetching and authorizing users from the database. We’ve also defined PasswordEncoder bean (BCryptPasswordEncoder) which uses the BCrypt hashing algorithm - our password has to be encrypted.
Now We can save new users in the CommandLineRunner. Inject UserRepository to the WalletApplication and add users:
  package net.devdiaries.wallet;

import net.devdiaries.wallet.domain.Currency;
import net.devdiaries.wallet.domain.CurrencyRepository;
import net.devdiaries.wallet.domain.User;
import net.devdiaries.wallet.domain.UserRepository;
import org.springframework.beans.factory.annotation.Autowired;
import org.springframework.boot.CommandLineRunner;
import org.springframework.boot.SpringApplication;
import org.springframework.boot.autoconfigure.SpringBootApplication;
import org.springframework.context.annotation.Bean;

import java.math.BigDecimal;

@SpringBootApplication
public class WalletApplication {

 @Autowired
 private CurrencyRepository currencyRepository;

 @Autowired
 private UserRepository userRepository;

 public static void main(String[] args) {
 SpringApplication.run(WalletApplication.class, args);
    }

    @Bean
 CommandLineRunner runner() {
        return args -> {
//            Save demo data after start
  userRepository.save(new User("admin", "$2a$04$KNLUwOWHVQZVpXyMBNc7JOzbLiBjb9Tk9bP7KNcPI12ICuvzXQQKG"));

 currencyRepository.save(new Currency("US Dolar", "USD", new BigDecimal(100), new BigDecimal(3.92)));
 currencyRepository.save(new Currency("Euro", "EUR", new BigDecimal(300), new BigDecimal(4.52)));

        };
} }
We have just saved the “admin” user to our database. $2a$04$KNLUwOWHVQZVpXyMBNc7JOzbLiBjb9Tk9bP7KNcPI12ICuvzXQQKG is BCrypt-encrypted “admin” password (You can use online encryptors to encrypt another password).
Now, if you do GET request to the localhost:8080/currencies you will get a 401 Unauthorized HTTP error. You should authenticate to be able to get currencies (You can do this using the Authorization function in Postman or using curl -u admin).
Securing application using JWT token
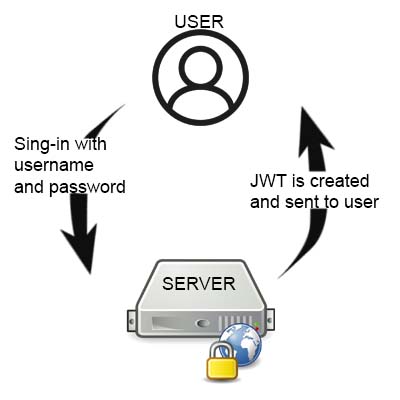
Our authentication method is not usable when we are going to use our own frontend app. We are going to use the JSON Web Token (JWT) authentication.
JWT defines how to exchange data between web services in a secure way through a JSON object. The information sent can be verified thanks to a digital signature, which is an element of the token.
The JWT token is signed using the signature - the HMAC algorithm or with the RSA public/private key.
Each JWT token contains three parts separated by dots:
- Header: defines the type of the token and the hashing algorithm,
- Payload: contains information about the user
- Signature: used to verify that JWT has not been changed.
You can see the main idea of the JWT in the following image:
Creating Authentication Functionality
Let’s create a service (in the net.devdiaries.wallet.services package) that will create and validate the JWT token. The service will be called AuthenticationService:
package net.devdiaries.wallet.services;

import io.jsonwebtoken.Jwts;
import io.jsonwebtoken.SignatureAlgorithm;
import org.springframework.security.authentication.UsernamePasswordAuthenticationToken;
import org.springframework.security.core.Authentication;

import javax.servlet.http.HttpServletRequest;
import javax.servlet.http.HttpServletResponse;
import java.util.Date;

import static java.util.Collections.emptyList;

public class AuthenticationService {
    static final long EXPIRATIONTIME = 864_000_00;
    static final String SIGNINGKEY = "signingKey";
    static final String BEARER_PREFIX = "Bearer";

    static public void addJWTToken(HttpServletResponse response, String username) {
        String JwtToken = Jwts.builder().setSubject(username)
                .setExpiration(new Date(System.currentTimeMillis() + EXPIRATIONTIME))
                .signWith(SignatureAlgorithm.HS512, SIGNINGKEY)
                .compact();
        response.addHeader("Authorization", BEARER_PREFIX + " " + JwtToken);
        response.addHeader("Access-Control-Expose-Headers", "Authorization");
    }

    static public Authentication getAuthentication(HttpServletRequest request) {
        String token = request.getHeader("Authorization");
        if (token != null) {
            String user = Jwts.parser()
                    .setSigningKey(SIGNINGKEY)
                    .parseClaimsJws(token.replace(BEARER_PREFIX, ""))
                    .getBody()
                    .getSubject();

            if (user != null) {
                return new UsernamePasswordAuthenticationToken(user, null, emptyList());
            } else {
                throw new RuntimeException("Authentication failed");
            }
        }
        return null;
    }
}
In the beginning, we defined several constants. EXPIRATIONTIME defines the expiration time of the token (24 hours), SIGNINGKEY is used to sign the JWT (by verifying the JWT token we have a guarantee that it comes from our application), BEARER_PREFIX is the prefix of Authorization token - we use Bearer schema. The addJWTToken() creates the JWT and adds it to the Authorization header. We also had to add Access-Control-Expose-Headers header due to JS limitations on the frontend side. The getAuthentication() method gets the JWT token from the Authorization header.
Next, create a POJO class with user credentials in domain package:
package net.devdiaries.wallet.domain;

import lombok.Getter;
import lombok.Setter;

@Getter
@Setter
public class UserCredentials {
    private String userName;
    private String password;
}
We do not have to mark this class with @Entity because this class will only keep credentials for authentication. We do not want to create a new table in the database.
Finally, we need to create two filters that will handle requests:
1 - Filter for login and authentication - LoginFilter.java which handles all POST request to the `/login’ endpoint:
package net.devdiaries.wallet.services;

import com.fasterxml.jackson.databind.ObjectMapper;
import net.devdiaries.wallet.domain.UserCredentials;
import org.springframework.security.authentication.AuthenticationManager;
import org.springframework.security.authentication.UsernamePasswordAuthenticationToken;
import org.springframework.security.core.Authentication;
import org.springframework.security.core.AuthenticationException;
import org.springframework.security.web.authentication.AbstractAuthenticationProcessingFilter;
import org.springframework.security.web.util.matcher.AntPathRequestMatcher;

import javax.servlet.FilterChain;
import javax.servlet.http.HttpServletRequest;
import javax.servlet.http.HttpServletResponse;
import java.io.IOException;
import java.util.Collections;


public class LoginFilter extends AbstractAuthenticationProcessingFilter {

    public LoginFilter(String url, AuthenticationManager authManager) {
        super(new AntPathRequestMatcher(url));
        setAuthenticationManager(authManager);
    }

  @Override
  public Authentication attemptAuthentication(
            HttpServletRequest req, HttpServletResponse res)
            throws AuthenticationException, IOException {
        UserCredentials userCredentials = new ObjectMapper()
                .readValue(req.getInputStream(), UserCredentials.class);
        return getAuthenticationManager().authenticate(
                new UsernamePasswordAuthenticationToken(
                        userCredentials.getUserName(),
                        userCredentials.getPassword(),
                        Collections.emptyList()
                )
        );
    }

  @Override
  protected void successfulAuthentication(
            HttpServletRequest req,
            HttpServletResponse res, FilterChain chain,
            Authentication auth) {
        AuthenticationService.addJWTToken(res, auth.getName());
    }
}
We extended AbstractAuthenticationProcessingFilter class which requres authenticationManager property in the Spring context (We’ve set it in the SecurityConfiguration class). If the authentication is successful, the successfulAuthentication method will be executed and then the addJWTToken() from AuthenticationService class will add the JWT to the Authorization header.
2 - Filter for handling in all other endpoints:
package net.devdiaries.wallet.services;

import org.springframework.security.core.Authentication;
import org.springframework.security.core.context.SecurityContextHolder;
import org.springframework.web.filter.GenericFilterBean;

import javax.servlet.FilterChain;
import javax.servlet.ServletException;
import javax.servlet.ServletRequest;
import javax.servlet.ServletResponse;
import javax.servlet.http.HttpServletRequest;
import java.io.IOException;

public class AuthenticationFilter extends GenericFilterBean {

  @Override
  public void doFilter(ServletRequest request, ServletResponse response, FilterChain filterChain)
            throws IOException, ServletException {
        Authentication authentication = AuthenticationService.getAuthentication((HttpServletRequest)request);

        SecurityContextHolder.getContext().setAuthentication(authentication);
        filterChain.doFilter(request, response);
    }
}
This filter extends GenericFilterBean and gets a token from the request header.
Finally, we have to update SecurityConfiguration class by overriding the configure() method. The following source code shows the SecurityConfiguration final code:
package net.devdiaries.wallet.configuration;

import net.devdiaries.wallet.services.AuthenticationFilter;
import net.devdiaries.wallet.services.LoginFilter;
import net.devdiaries.wallet.services.UserDetailsServiceImpl;
import org.springframework.beans.factory.annotation.Autowired;
import org.springframework.context.annotation.Bean;
import org.springframework.context.annotation.Configuration;
import org.springframework.http.HttpMethod;
import org.springframework.security.config.annotation.authentication.builders.AuthenticationManagerBuilder;
import org.springframework.security.config.annotation.web.builders.HttpSecurity;
import org.springframework.security.config.annotation.web.configuration.EnableWebSecurity;
import org.springframework.security.config.annotation.web.configuration.WebSecurityConfigurerAdapter;
import org.springframework.security.crypto.bcrypt.BCryptPasswordEncoder;
import org.springframework.security.crypto.password.PasswordEncoder;
import org.springframework.security.web.authentication.UsernamePasswordAuthenticationFilter;
import org.springframework.web.cors.CorsConfiguration;
import org.springframework.web.cors.CorsConfigurationSource;
import org.springframework.web.cors.UrlBasedCorsConfigurationSource;

import java.util.Arrays;

@Configuration
@EnableWebSecurity
public class SecurityConfiguration extends WebSecurityConfigurerAdapter {

  @Autowired
  private UserDetailsServiceImpl customUserDetailsService;

  @Bean
  public PasswordEncoder passwordEncoder() {
        return new BCryptPasswordEncoder();
    }


  @Override
  protected void configure(HttpSecurity http) throws Exception {
        http.csrf().disable().cors().and().authorizeRequests()
                .antMatchers(HttpMethod.POST, "/login").permitAll()
                .anyRequest().authenticated()
                .and()
                .addFilterBefore(new LoginFilter("/login", authenticationManager()),
                        UsernamePasswordAuthenticationFilter.class)
                .addFilterBefore(new AuthenticationFilter(),
                        UsernamePasswordAuthenticationFilter.class);
    }

  @Bean
  CorsConfigurationSource corsConfigurationSource() {
        UrlBasedCorsConfigurationSource source = new UrlBasedCorsConfigurationSource();
        CorsConfiguration config = new CorsConfiguration();
        config.setAllowedOrigins(Arrays.asList("*"));
        config.setAllowedMethods(Arrays.asList("*"));
        config.setAllowedHeaders(Arrays.asList("*"));
        config.setAllowCredentials(true);
        config.applyPermitDefaultValues();

        source.registerCorsConfiguration("/**", config);
        return source;
    }

  @Autowired
  public void configureGlobal(AuthenticationManagerBuilder auth) throws Exception {
        auth.userDetailsService(customUserDetailsService).passwordEncoder(new BCryptPasswordEncoder());
    }
}
We defined that requests for all requests (except /login endpoint) requires authentication. We also added CORS filter. This is needed for frontend which is sending request from the other origin.
Summary
Run the application and call the /login endpoint with the POST HTTP method (using a postman or curl). In body add username and password which are in the database: 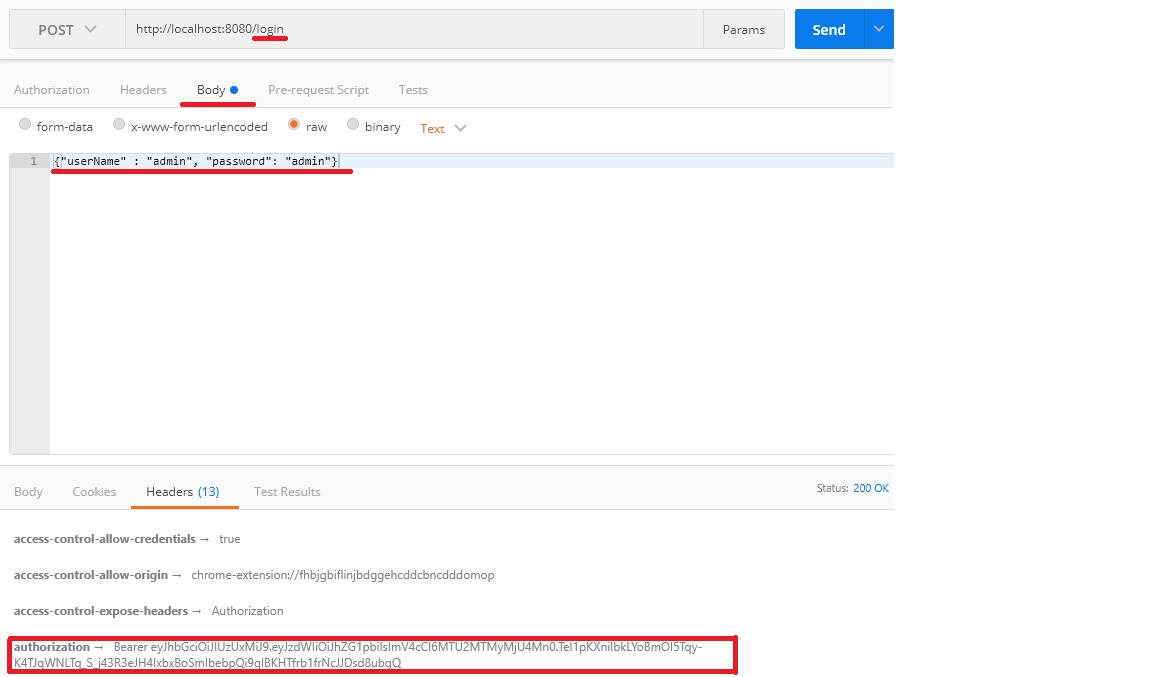
As you can see, we got JWT in response (Authorization header - at the bottom of the picture). Copy this token and add it to the Authorization header in the request for localhost:8080/currencies. In response, you will receive all the currencies.
Congratulations, the backend is almost ready! In the next post, we will start to create a frontend in React.